A must-have accessory for any automobile is a dashcam, which can protect you from false insurance claims and capture entertaining footage for future cross-country road trips. My preferred choice for in-car dash cams involves concealed wiring to maintain a clean appearance. In this blog post, I’ll demonstrate how to install a dashcam in a 2017 Ford Explorer Platinum with minimal visible wiring. This tutorial will be divided into two parts: installing the front camera and the rear camera.
What I’ll be using:
Products:
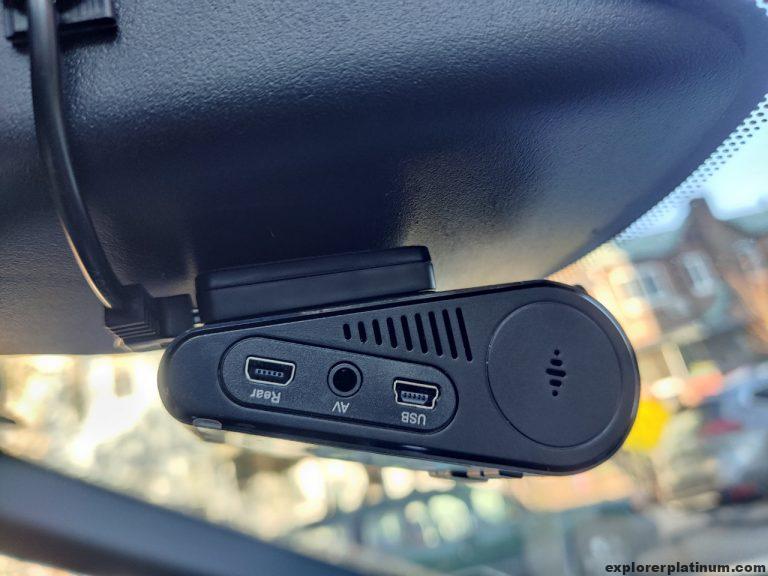
- VIOFO A129 Pro Duo 4k Dash Camera
- VIOFO HK3 ACC Hardwire kit
- Micro2 Fuse Tap
- 3M Scotch All-Weather Fasteners (Used this mount the dashcam)
Tools:
Installing the Front Camera
Step 1: Remove plastic shield
 To access the fuse tap, it is necessary to remove a plastic shield. This shield is secured by two 7mm screws and a Christmas tree fastener.
 There isn’t a straightforward method for removing the Christmas tree fastener without damaging the fastener. After removing the two 7mm screws, I used a bit of force to pull the plastic shield away from the fastener.
 Here’s a picture of what the shield looks like once it’s taken out, the very left is where the Christmas fastener is located, the middle and right are the 7mm screws.
Step 2: Install the dashcam wire kit
With the plastic shield removed, I moved the seats all the way back to create enough space to install the dashcam wiring kit.
For the 2017 Ford Explorer Platinum, I tapped into MICRO2 type fuses. I installed these into slot 36 (ACC) and slot 32 (battery). First, I removed the fuses from their respective slots and then installed them onto the fuse tap. A photo below outlines my process. I used needle-nose pliers to remove the fuses because the fuse removal tool included in the fuse tap kit was difficult to use effectively.

Afterwards, I inserted the fuse tap into slot 36 for the ACC wire and then slot 32 for battery power.

For the ground wire, I was able to find a bolt that’s located right behind the steering column. I was able to loosen the bolt with a 10mm socket, slide in the ground wire prong in and then tighten it. It was a perfect fit.
 Where I connected the ground wire.
Step 3: Removing the side piece of the dashboard
This step was surprisingly simple. All I did was insert a slim trim removal tool, gently pry the side piece, and it popped out easily.

Step 4: Wiring to the front camera
I was a bit apprehensive about this part, as I wasn’t sure whether the wires would be entirely concealed or if they would stand out prominently. Fortunately, all the wires fit snugly between the trims and weatherstripping, ensuring a neat appearance. For this step, I managed to tuck the wires between the weatherstripping and the trims, as needed. When I reached the windshield area, I could easily stuff the wires beneath the headliner. A helpful tip to keep in mind: there isn’t much room to hide excess wire, so it’s best to start from the camera and work your way toward the dashboard. This approach ensures that you only have to deal with the necessary length of wire, avoiding any unsightly excess.
 Pulling the dashcam wire through.
 Tucking the dashcam wire under the pillar trim.
 Hiding the wire in between the door weather strip.
 After reaching the top of the door, I was able tuck the USB wire under the side pillar trim. Then I ran the wires under the roof liner.
Step 5: Install and test the front camera.
After completing the wiring process, I decided it was a good time to check if the front camera was functioning correctly. I wanted to make sure the wire was properly grounded and the fuse tap was working as intended. Much to my relief, the dashcam powered on successfully, confirming that everything was set up correctly.

Installing the Rear Camera
Step 6: Routing the wire for the rear camera.
For this step, it was more convenient to start at the front and work my way to the rear. Fitting the wires between the headliner, trim, and weatherstripping took about 5 minutes.
 Started from the front, ran it under the roof liner first and then tucked into the side pillar trim.
 Then I ran the cord in-between the weather strip and and tucked it into the trim pieces when needed. I hid all the excess wires into the rear side pillar.
Step 7A: Wiring and mounting the camera (easy method)
After spending an hour attempting to remove the tailgate’s upper cover trim, I opted for a simpler approach to mount the camera due to the fading daylight. While this method isn’t my favorite because I prefer to keep all wires concealed, I’ll show an alternative method for hiding the wires in Step 7B.
I mounted the camera to the upper trim cover of the tailgate and used a plastic clip provided in the kit to secure the USB wire.

 Not my most favorite method because the wires are dangling when I looked in the rear
Step 7B: Wiring and mounting the camera (more challenging method)
Sometimes, the more challenging path leads to the most satisfying results, and this is true when installing dashcams. As I mentioned earlier, I prefer to keep my wires hidden as much as possible, so this step is slightly more complex. To achieve this, I removed around four trim pieces and fed the wire through the rubber accordion hose.
I began by unclamping the plastic hook-type clips on the sides of the trim near the ends. To do this, I had to pry the plastic towards me until the clips were released:
 Prying the the trim piece towards me. Once I was able to unhook the plastic hook clip I then pulled the metal clip off. Below are pictures of the plastic and metal clip.
 Here’s what it looks like from behind. There’s a plastic hook clip (top) and a metal clip (bottom).
Once the sides of the trim was released, I worked on the center of the trim piece. I held onto the plastic trim and pulled out each metal clip. I didn’t take any pictures of this process but below is the picture and location of the clips:
 These are the locations of the metal clips for the upper trim piece of the tailgate.
Next, I removed the rear trim on the side pillars.
 The right trim was able to pop off but the left trim was a bit stubborn.
 For the left trim, I was able to insert a flat head on the middle of the metal clip. Once I pressed down it released the trim.
The final piece I had to remove was two fastener holding the rear headliner. I was able to slightly pull down the rear headliner and see two white fasteners connecting it to the ceiling.

To separate the white fasteners, I inserted the trim removal tool in-between the white flange and the roof:

Next, I had to route the wire from the inside to the windshield my plan was to feed it through the rubber hose. This was honestly the most difficult part since I didn’t have any fishing wire or wire-wire pulling lubricant to help out. I removed the top and bottom of the rubber hose. With some pulling and squeezing the ends, they were able to pop out.

Once the rubber accordion hose has been disconnected I pushed the USB wire through. It took a combination of pushing and massaging the hose to even see the tip of the USB. I wasn’t able to push anymore USB wire through so I compressed the rubber piece as much as I can (like an accordion) and then used a needle nose plier to pull the out the rest of USB cable. I made sure I clamped onto the plastic part of the USB and not the metal tip.
I hid the excess wires in the roof liner and reinstalled the headliner and the side trims. Finally, I mounted the camera.

 Tada! No dangling wires.
While this method involved more steps, the result was worth it. The installation looks more professional, and best of all, there are no dangling wires.
Installing a dashcam in your vehicle not only offers protection against false insurance claims but also allows you to capture memorable moments on the road. While the process can be challenging at times, with patience and attention to detail, you can achieve a clean and professional installation. Whether you choose the simplified or more complex method, you’ll be enhancing your driving experience and gaining peace of mind with your newly installed dashcam. Feel free to leave a comment and let me know how your experience went!
Thank you very much for posting this. Been racking my brain trying to figure out how to wire in and install a camera in the rear of the car. I used a small piece of leftover copper wire (soft and should straighten out before damaging anything) to fish the power cable through the rubber boot between the hatch. I also simply plugged into the 12v outlet in the drivers rear corner. It’s never used and is switched to the ignition. Perfect for what we need.
I’m stoked to hear that our post helped you out with wiring and installing a camera in the rear of your car. That’s an awesome hack with the copper wire to fish the power cable through the rubber boot – creative thinking! And plugging into the unused 12v outlet in the driver’s rear corner is a smart move!
Thanks for this! Just installed in a 2012 and it was super helpful. For anyone reading doing this for a 2012, the fuses seem to be a bit different–I used 19 for the battery connection (memory seat power) and 38 for accessory (auto-dimming rear view mirror, moon roof).
This is exactly what I’ve been looking for, mostly the rear camera portion! I have a 2022 Timberline I just got a camera for yesterday and have been trying to plan it out before I just start taking things apart and the rear worried me the most. Thanks for the step-by-step and pictures that are useable and just so close that I can’t tell what part of the car they are.
Cheers!
Helpful thanks for the info.
I am SO glad I found this write up, and thank you so much for doing it!
I have a 2017 XLT. That fuse panel is in a location that should result in a class action lawsuit against Ford! I have poor flexibility due to a medical condition, so it is very painful to reach that fuse box! I tried pulling a few fuses on my own and testing with a multimeter to figure out which were always on and which were ignition-controlled, but was having no luck and quickly running out of steam!
Now that I know exactly which fuses to use and for what, you’ve just made this task a hundred times easier! Thank you so much!
(Fittingly, I also have a Viofo, but it’s the A229. The hardwire kit I ordered several months ago and am only now doing anything with has a USB-C connector on it, and I think the camera is mini-USB, so I’m probably going to need an adapter, but I’ll find out when I go out there today to finish the job!)
Excellent job, Thank you for sharing this install, I have the 229 Pro and pretty much hard wired the same as you, for the rear rubber boot I did use a cable tie to push through and taped my cam cable to that to pull through. I have a different fuse box in my 2018 Platinum that has 3 leg fuses (micro3) – typical that the hard wire Viofo kit has only 2 leg fuse so im having to wait till the new fuse tap is delivered to finish my install. all the excessive wiring I managed to cable tie in the hole that came from panel by the door. The fuse box is in such an awkward position, you need to be a contortionist haha.
Im getting an intermittent alternator whine after installing camera, following the directions above. I have a 2017 explorer sport. It’s hard to tell exactly where the sound is coming from, but i suspect the speakers. What’s odd is that it is intermittent, and seems to get worse as the engine gets closer to operating temperature. But it’s coming from inside the car. You can’t really hear it under the hood. What’s even stranger, is that the fans that control the ac fans for the seats now add to the noise. The noise only happens when engine is running.
Interesting. If you unplug the wiring, does the noise stop?
Will these fuses work for a 2022 Ford explorer?
Will this work for a 2022 Ford explorer?? The fuses I mean?