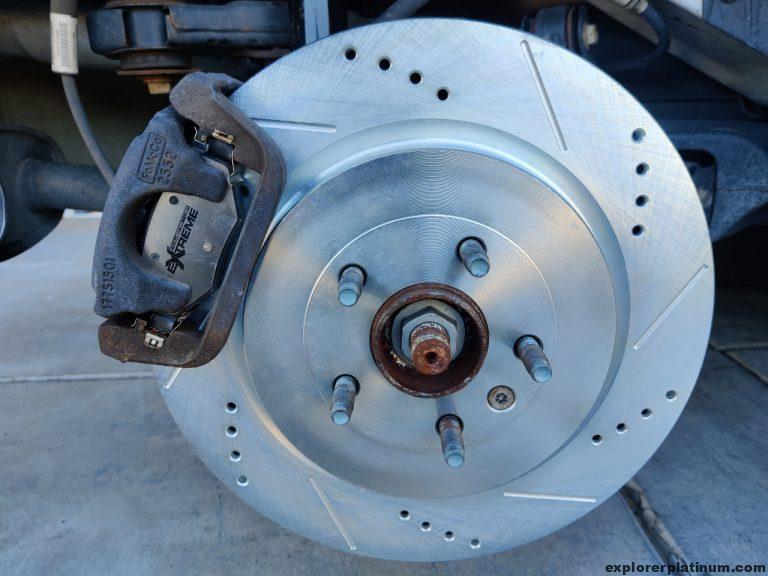
I noticed some grooves on the front and rear rotor for my 2017 Explorer Platinum. Since this car was originally from the East coast, most likely sand and dirt got caught in between the rotors and pads. Despite having the grooves, I did not noticed any braking issues. But all the reason for me to upgrade my rear rotors and brake pads to PowerStop. Why PowerStop? I had good experience with them on my Xterra so I decided to add them onto my Explorer.
While researching brake pads and rotors, I learned that Explorers can have two different front rotor sizes, which dictate the type of rotors needed for the rear. Explorers can come with either standard (325mm) or heavy-duty (352mm) front rotors, with the standard accompanied by non-vented rear rotors and the heavy-duty by vented rear rotors. For my 2017 Explorer Platinum, the correct front rotor size is the heavy-duty (352mm) version, paired with vented rear rotors.
What I used:
- PowerStop K6375-36 Front and Rear Z36 Kit
- T40 Torx Bit to remove the set screw
- 19mm deep socket to remove lug nut
- 15mm socket to remove caliper bracket bolts
- 13mm socket to remove caliper bolts
- Breaker bar to remove stubborn bolts like the caliper bracket bolt
- Copper Anti-seize, applied to rotor mating surface and brake pad tab
- Wire Brush, for cleaning any rust
- SIL-Glyde Silicone Based Lubricant for guide/lock pins.
- Lisle 28600 Disc Brake Piston Tool for compressing the rear brake piston
- 3/8″ Drive Extension for use with the Lisle 28600
- Brake cleaner for cleaning off grease from the rotors and helpful to remove any grease
Step 1. Slightly Loosen lug nut from wheel. Note: Loosen, not remove.

Slightly loosen the 19mm lug nut from the rear tire so when it’s off the ground it’ll be easier to take off.
Step 2. Jack car up.
Jacking up the rear should be good enough if you are only changing the rear suspensions.
Step 3. Take off the lugs nuts and remove the wheel.

Now that the wheel is off the ground, you should be able to take the lug nuts off entirely and remove the wheel.
Step 4. Remove the rotor set screw
Take advantage of the brake pads and remove the rotor screw. It’ll help to keep the e-brakes on to prevent the rotor from spinning. The rotor set screw will require a T40 Torx bit.

Step 5. Release the e-brakes, if you haven’t
When working on the rear rotor, the e-brakes need to be released.
Step 6. Take off caliper bracket

To remove the bracket I used a 15mm socket. Removing the bracket will also remove the caliper body with it.

Once the bracket bolts were removed I was able to pull off the brake caliper. To prevent the caliper from dangling, I placed it on top of the upper control arm. I do suggest using a zip-tie to secure it just to be safe.
Step 7. Remove old rotor and put on new one.

Once the rotor is removed, I took the opportunity to clean the mating surface. I cleaned it with a wire brush and applied copper anti-seize on the mating surface.

Before putting on new rotors I always clean the factory oil off of it by using a brake cleaner. This is to prevent oil from contaminating the brake pads. Next, install the rotor set screw.
Step 8. Install back the caliper bracket

It was a little difficult to put back on the caliper so I had to take off the outside brake pad.
Step 9. Remove the brake caliper
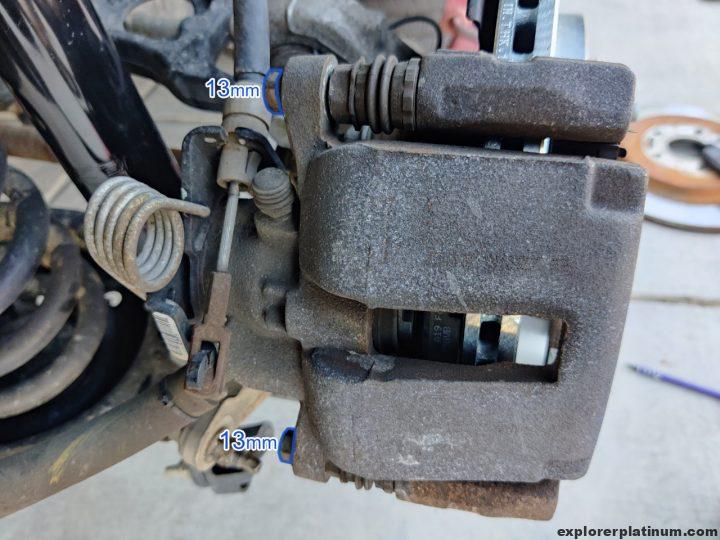
The brake caliper is held back by 13mm lock bolts.

Once the 13mm bolts were removed I was able to take off the brake caliper and sit it on somewhere safe. Do not let the brake caliper dangle.
Step 10. Remove old brake pads, install new clips, brake pads and re-grease pins.
What’s nice about the PowerStop brake kit is that it came with new clips, pin boots, pin bushing so I’ll be replacing those too.
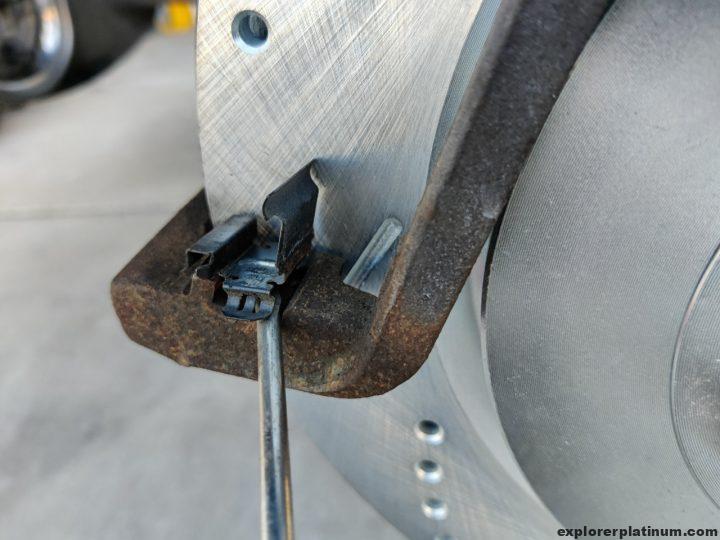
Once I removed the old pads, I had to use a flat head screwdriver to pop out the previous clips. Helpful tip: Replace the clip as you remove them. The clips do have a specific orientation.

With the old clips removed, I took the opportunity to clean the rust beneath it with a wire brush. It makes installing the new clips a lot easier.

What a beauty, new clips installed. 

Installed new pads, I added some cooper-anti seize to the tabs of the brake pad

PowerStop brake pads comes with wear indicators. I installed mine on the inside.

PowerStop kits come with the pin boot and pin bushing so I replaced those. PowerStop only came with two total guide pin bushing instead of four. The bushings looked fine so I just replaced one on each side.

Relubricating my pins with SIL-Glyde Silicone Based Lubricant.
Step 11. Reinstall brake caliper

Before the brake caliper can be installed, the piston needs to be compressed. These pistons require special tool to do so, I bought the Lisle 28600.

I used a 3/8″ x 6″ extension coupled with the Lisle 28600 and turned the piston clockwise.
Helpful notes:
- It might be helpful to clean the piston grooves of any gunk so the Lisle 28600 can fit flush with the piston.
- Apply constant pressure when turning. The Lisle 28600 might slip, it’ll take some practice.
- What happens if you don’t have a Lisle 28600? I don’t recommend this but I’ve used a needle nose plier in the past on a similar rear brake piston. Reason why I don’t recommend it because I remember breaking the needle nose pliers when turning.

Once caliper’s compressed it can be be reinstalled with the 13mm bolts.
Lastly, install your wheels and you’re done. This brake change reminded me of the time when I owned a 1997 Nissan Maxima, it also required a special tool to decompress the piston. Overall, this was not too different compared to other rotor/brake changes I have done. Let me know how your experience went!
Nice tip with the Lisle Tool. I used Channel lock pliers…
As far as the Torx set screw that holds in the rotor:
They are the most annoying useless part on the Explorer. From what I’ve read, they are only needed for assembly purposes at the factory to hold the rotor on the hub.
You don’t actually need them when changing the brakes. If you want to keep using them, I suggest getting one with a hex head instead of the Torx. (M8 x 20mm Hex Countersunk set screw)
Also, don’t forget to bed (break in) the new brakes.
Nice write-ups!
Hi Nate! Glad my tips were able to help you.
You had trouble too with the torx screws too? Yeah mine was rusted in and it was difficult to remove. I did strip one of them and during my research I did come across similar info that it was only used for assembly purposes.
Yes, don’t forget about bedding the brakes.