
While the PTU fluid in a 2017 Ford Explorer Platinum is considered a lifetime fluid, many owners recommend changing it every 30,000 miles. With 55,000 miles on my PTU, I decided to change the fluid before my cross-country trip. In this two-part guide, we’ll cover the process of draining and filling the PTU fluid.
What I used?
- 1/4″ hex wrench to open the drain plug
- Permatex 59214 High Temperature Thread Sealant to prevent the drain plug from leaking fluid
- 75W-140 Gear Oil is the required fluid for the PTU
- Flat head screw driver to release the PTU vent hose fastener and to detach the plastic vent breather cap
- 5/16″ fuel hose to extend the PTU vent hose
- 5/16″ x 5/16″ brass hose fitting to extend the PTU vent hose
- MixMizer Injector to help put fluid back into the PTU
Draining the PTU
Step 1. Elevate the car.
Simply lifting the front should be enough.
Step 2. Remove the lower shield.
 There are 3 screws which can be loosened by hand.
Step 3. Locate the PTU drain plug.
 The drain plug should be placed next to a catalytic converter and above an O2 sensor.
Step 4. Insert a 1/4″ hex wrench into the drain plug.
 Luckily, I had a 1/4″ hex wrench in my toolbox. If you can’t find a 1/4″ hex wrench, you can use the bottom of a screw bit base as a substitute.
 My drain plug was seized, so I had to make use of a gas pipe fitting on my hex wrench to gain more leverage. I was able to loosen the drain plug after.
Step 5. Let it drain.
 I used the foil to guide the PTU fluid down. I was happy to see the fluid was bright yellow-brown and not black.
 I’m glad I performed this maintenance at 55,000 miles. I wish the previous owner had changed it at 30,000 miles. The illustration above doesn’t accurately reflect how sparkly the fluid looked. But if you examine it closely, you can view specs of glitter.
 At the tip of the drain plug there will be some metallic debris. Do not be surprised to see more of this debris stuck near the PTU’s drain hole.
 14 Oz of fluid were drained.
Step 6. Put back the drain plug.
 Once it’s done draining, I applied some Permatex 59214 High Temperature Thread Sealant along the drain plug and reinstalled it.
Step 7. Reinstall the lower shield.
There’s no need for me to be under my car anymore so I reinstalled the bottom shield in Step 1.
Filling the PTU
Oh, the challenges I faced with this particular task! I initially planned to extend the PTU vent tube, but removing the plastic vent tube cap from the top of the engine bay proved to be quite difficult. I then attempted to disconnect the entire hose by pulling on it, but it refused to budge. Fortunately, I stumbled upon an easier method: lengthening the hose from underneath the car.

Make sure you familiarize yourself with the location of the vent breather cap, so that you have an idea of what it looks like underneath the car. The arrow in the picture above points to the location of the breather cap.
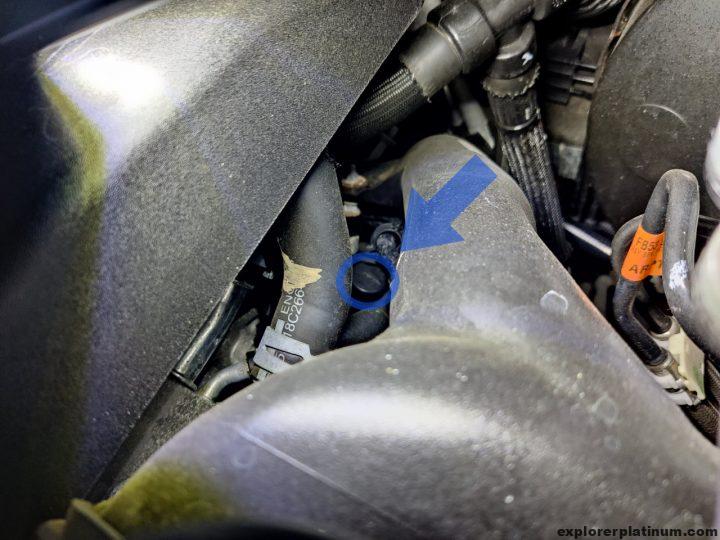 It’s a small, round plastic cap that is well concealed.
Step 1. Disconnect the hose fastener from the engine block.
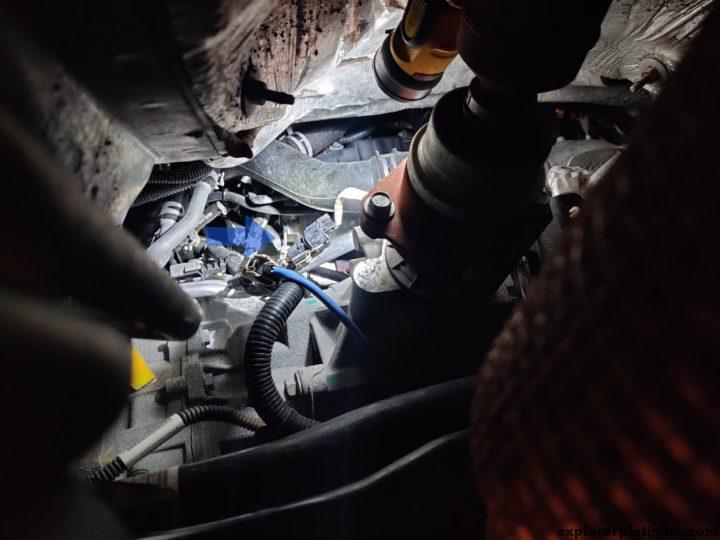
Here’s a far out picture of the fastener that holds the vent hose pipe. To access this area I had to go under the car and move under the front of the drive shaft.
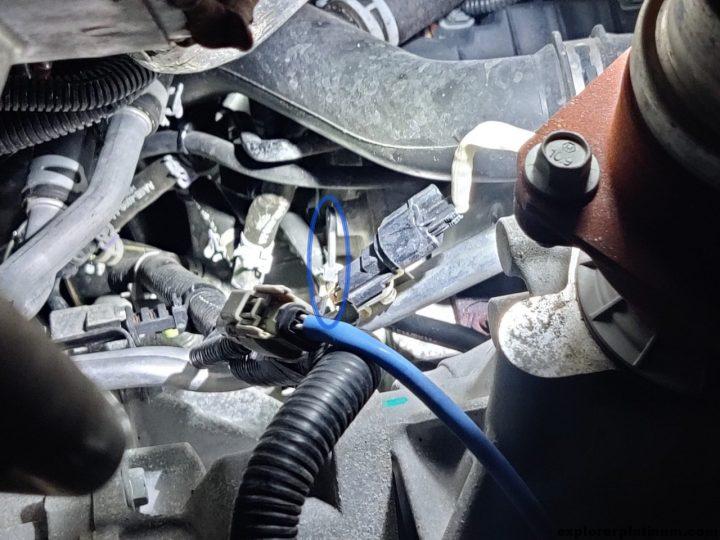 A zoomed up picture of the fastener that holds the PTU vent hose. I used a flathead screw driver to pry it off. I was surprised by how effortlessly it came off.
Step 2. Remove the plastic vent breather cap.
I used a flat head screw driver to wiggle the plastic vent breather cap off from the hose. I inserted the flat head screw driver in between the rubber and the vent breather and slightly rotated my flat head screwdriver clock wise to push the vent breather out. Did that a few times around the vent breather and it eventually came out.
Step 3. Extend the hose.
 Now that the hose is open. I inserted the 5/16″ x 5/16″ barb and connected 3′ of fuel line to complete the extension. After, I routed the extended fuel line to the engine bay.
Step 4. Filling the PTU

The easiest way to refill the PTU is to use this plastic syringe injector called the MixMizer injector. Feel free to use anything that’s similar but this worked perfectly for me since it was easy to insert, fill, and then remove.

Insert the syringe without the plunger.

Pour in 75W-140 gear oil. You will see the liquid level steadily decrease and then stop, quite possibly due to an air gap. To make things flow faster, I’ll force the liquid down by by using the syringe’s plunger.

Using this method I was able to push majority of the fluid down. However, when pulling the plunger upwards, around 20 percent of fluid will travel back. I did this around eight times.
Step 5. Reinstall the plastic vent hose breather cap and zip tie it down.

Wondering what happened to the top cap? I somehow lost the cap when attempting to pull it off. I spent a good hour looking for the cap but couldn’t find it. I’ll be replacing it in the future but no rush in replacing it now since this will be under the engine cover.
After confirming that 14oz had drained from the bottle, I reinstalled the vent breather cap and used a zip tie to secure the hose in place.
In retrospect, changing the fluid in my PTU made me appreciate the simplicity of maintaining a Nissan Xterra. The Explorer PTU lacks a fill hole, and depending on the model year, some may not even have drain holes. Thankfully, my 2017 Ford Explorer Platinum came with one. The entire PTU fluid change took me close to four hours, with the majority of that time spent attempting to remove the vent hose breather cap. If I were to start over with the knowledge I have now, I’m confident it would take me no more than 30 minutes. The next drain and fill should be even more straightforward since everything is already in place. Stay tuned for an update on my progress!
Maintaining the PTU Fluid Update
As promised, here’s an update on my PTU maintenance journey. I’ve now reached 30,000 miles (85,000 miles on the odometer), signaling that it’s time to drain and refill the PTU fluid.

This time around, the process was significantly smoother. I must admit that I made a bit more of a mess when draining, as my drain “slide” wasn’t as well-crafted as before. However, the experience was still nearly as effortless as changing engine oil (though some days can be messier than others). I managed to drain and collect 14 oz of fluid, but due to windy conditions, some spilled onto the side of the oil pan, leading me to add approximately 16 oz this time.

What the plug looks like.

Regarding the fluid’s appearance, it still exhibited a slight glittery sheen. This could be due to remnants of the original factory fluid since I hadn’t previously performed a full flush. It will be interesting to see if the next fluid change appears less sparkly.
Thank you for sharing this.
Anytime! Glad you found it helpful.
2019 Ford explorer: Audible “clunk” upon acceleration and deceleration. Mechanic told me it was the PTO. (Supposedly normal) The ‘clunk” is not loud but it was noticeable.
This seems strange that one should hear this. Has anyone else experienced a similar symptom? Will it become a problem?
Hello there, Tom! That would be annoying if there was a clunk each time you accelerate and decelerate. I can imagine each time it clicks it just brings that tiny annoyance. Sorry for the belated response, but during the time that you sent your comment, I have been attempting to hear if there’s any audible clanks when accelerating and decelerating. Regrettably, I found none. Only a very little feedback (or recoil) was felt when pressing the gas pedal and letting it go. Maybe try another dealership to see if they can offer a better response so you can get your car back to operating normally.
What motor is this?
The motor is the 3.5 EcoBoost.
Thank you for the guide I have the exact same vehicle. I think it might be too late for my ptu. Large metal shavings on the plug
Hello Seb! I am happy to hear that my guide was useful to you. Could you please share with me the current mileage of your car? Also, I am curious to know if you encountered any problems with your PTU that led you to consider changing the fluid?
Nice write up…. I have a 2017 Explorer Sport… 68,969 miles…
Today I first dealt with adding the vent hose extension (didn’t want to drain all the oil out without knowing I’d be able to refill it)… I couldn’t do it from the bottom… I just could not identify the correct hose… I did mine from the top… Had to remove the battery and some of the charge piping… That vent cap was a real chore to remove… I noticed it has a Goretex membrane (white disc), which prevents moisture from being sucked back when the engine cools down…. Now at this point I’m ready to drain and replace the gear oil… I’m using Ford fluids…
Hi Chuck! Thanks for sharing your experience with your 2017 Explorer Sport. It sounds like you’re really hands-on with your vehicle, which is great!
The vent hose extension installation can indeed be tricky, especially identifying the right hose from the bottom. Your approach from the top, although more labor-intensive, seems to have worked well. Removing the battery and charge piping is certainly an extra step, but sometimes necessary to get the job done right.
Glad you were able to change out your fluid in the end.
Just did this on my 2017 Platinum and things went well.
However I’ll not that your Amazon link to the 5/16″ barbed fitting takes you to a 3/16″ fitting instead.
Hello Patrick! Thanks for the correction. It looks like they updated their product page and swapped the products. I went ahead and corrected the links. Thanks again!